When attendees upload files to the meeting workspace during the meeting as described in "Attending a meeting", the note taker can assign the uploaded files to topics in the meeting. Files assigned are available to all attendees, and when the meeting is ended, they are saved with the meeting minutes.
![]() The meeting cannot be ended until all
files added have been assigned or deleted.
The meeting cannot be ended until all
files added have been assigned or deleted.
When a file has been uploaded by an attendee and not yet viewed by the
note taker, an exclamation mark is shown on the Files
button ![]() .
.
![]() Click
the Files button.
Click
the Files button.
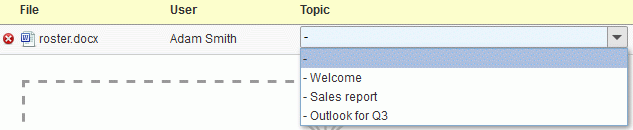
Any unassigned file is shown at the top of the Files dialog. The Topic column is empty, indicating that the file has not yet been assigned.

![]() Do
one of the following:
Do
one of the following:
 If
you do not consider the file relevant to the meeting, delete it by clicking
the Delete button
If
you do not consider the file relevant to the meeting, delete it by clicking
the Delete button ![]() next to its name.
next to its name.
Otherwise,
select the topic that the file should be assigned to on the drop-down
in the Topic column.
If there is no agenda, the drop-down shows the meeting title.
![]() Close
the File dialog.
Close
the File dialog.
All attendees can now view the assigned file by clicking the paperclip icon next to the title of the topic that the file was assigned to.
If you open the Files dialog again, the assigned file is no longer listed.
If necessary, the note taker and the host can delete an assigned file
by clicking the red cross ![]() next to its name in the list of topic attachments.
next to its name in the list of topic attachments.
