When creating or editing users, you can assign security roles to them, governing the permissions they have in the organization's MeetingBooster installation. It is possible to assign several security roles to the same user based on both user groups and the user hierarchy as explained below. If no security roles are selected for the user, that user has the MeetingBooster default role (by user hierarchy).
For more information on adding or editing users, see "Adding users" and "Editing users".
For more information on security roles, see "Understanding security roles".
For more information on user hierarchies and user groups, see "Managing user hierarchies" and "Managing user groups".
It is possible to assign more than one security role to the same user. If you do this, and the different security roles give different access levels to the user, one simple rule applies: For each permission, the user gets the access level with the least restrictions.
Example: If a user has been assigned a security role by user hierarchy denying him permission to view other meetings and a security role by user group granting him global permission to view other meetings, that user will have the global permission to view other meetings.
![]() During user editing, click the Security
Roles tab.
During user editing, click the Security
Roles tab.
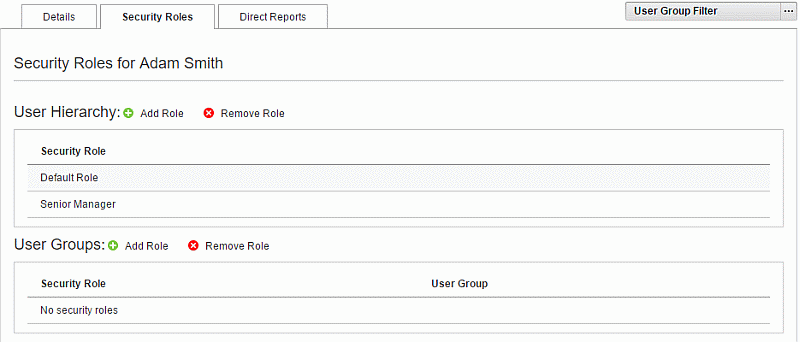
![]() Click Add Role
Click Add Role
![]() under User Hierarchy.
under User Hierarchy.
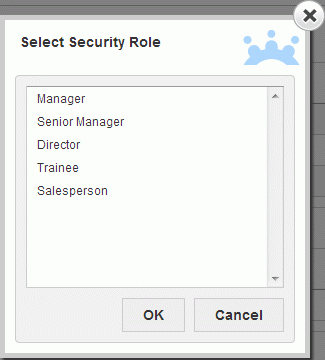
![]() In the dialog that appears, select the role the user
should have, and click OK.
In the dialog that appears, select the role the user
should have, and click OK.
![]() Click Save.
Click Save.
![]() All users have a system default security
role for user hierarchies. This role lets users access the meetings they
have created or been invited to and see projects they are a member of.
It is only necessary to create new security roles by user hierarchy if
one or more users in the user hierarchy needs additional permissions.
The default role cannot be deleted.
All users have a system default security
role for user hierarchies. This role lets users access the meetings they
have created or been invited to and see projects they are a member of.
It is only necessary to create new security roles by user hierarchy if
one or more users in the user hierarchy needs additional permissions.
The default role cannot be deleted.
![]() During
user editing, click the Security
Roles tab.
During
user editing, click the Security
Roles tab.
![]() Click
Add Role
Click
Add Role ![]() under
User Groups.
under
User Groups.
![]() In
the dialog that appears, select the role the user should have, and click
OK.
In
the dialog that appears, select the role the user should have, and click
OK.
By default, the security role is applied to the user group the user belongs to. If the security role should apply to a different user group, do the following:
![]() Click
the name of the user group shown in the User
Group column.
Click
the name of the user group shown in the User
Group column.
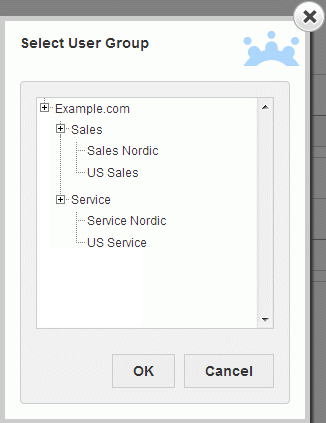
![]() In
the dialog that appears, select the user group the security role should
apply to.
In
the dialog that appears, select the user group the security role should
apply to.
![]() You can
also access the Select User Group dialog by clicking the three dots
You can
also access the Select User Group dialog by clicking the three dots ![]() at the far right of the security
role name on the Security Roles
tab.
at the far right of the security
role name on the Security Roles
tab.
![]() Click
OK.
Click
OK.
![]() Click
Save.
Click
Save.
Instead of assigning security roles to a user, you can also add one or more users to a security role. This is a practical way of assigning large numbers of users to the same security role.
![]() Click
Roles for User Hierarchy or Roles for User Groups under Security in the menu.
Click
Roles for User Hierarchy or Roles for User Groups under Security in the menu.
![]() Select
the security role that you want to add users to.
Select
the security role that you want to add users to.
![]() On
the Users tab, click Add
User
On
the Users tab, click Add
User ![]() .
.
![]() Select
one or more users, and click OK.
Select
one or more users, and click OK.
![]() During
user editing, click the Security Roles
tab.
During
user editing, click the Security Roles
tab.
![]() Select
the role to be removed.
Select
the role to be removed.
![]() Click
Remove Role
Click
Remove Role ![]() .
.
![]() Click
Save.
Click
Save.