 How much time is actually being spent in meetings
by all users, and who spends the most time?
How much time is actually being spent in meetings
by all users, and who spends the most time?On the Dashboards tab, you can generate various reports with information on your organization's use of MeetingBooster. The reports make it easier for the administrator (and organization management) to keep track of meeting statistics in the organization. Among other things, the dashboard reports make it possible to answer questions such as the following:
How much time is actually being spent in meetings
by all users, and who spends the most time?
What is the actual man hour cost of meetings
in the organization?
What do attendees think of the meetings?
Are tasks and meetings being executed on time?
How can meetings be handled more efficiently?
![]() You only have access to the Dashboards
tab if your security roles allow this. For more information, see "Understanding security roles"
and "Managing security roles".
You only have access to the Dashboards
tab if your security roles allow this. For more information, see "Understanding security roles"
and "Managing security roles".

The reports are grouped into five categories:
Meeting reports providing user attendance
and absence statistics for meetings, preparation and contribution information
and meeting cost information. For more information, see "Using
meeting reports".
Task reports providing information
on tasks. For more information, see "Using
task reports".
Feedback reports summarizing user
feedback on meetings. For more information, see "Using
feedback reports".
Performance
reports summarizing the overall
meeting performance in the organization. For more information, see "Using
performance reports".
Opportunity
reports identifying ways to improve meeting efficiency and lower
meeting costs in the organization. For more information, see "Using
opportunity reports".
![]() Dashboard reports provide useful data but do not necessarily tell the
whole story. For example, an attendee could be a great asset in a meeting
and still come up short in a dashboard report if the attendee's contributions
were not recorded as notes, and some meeting data such as feedback ratings
by their very nature are subjective. It is recommended to use common sense
when reviewing and acting on dashboard reports.
Dashboard reports provide useful data but do not necessarily tell the
whole story. For example, an attendee could be a great asset in a meeting
and still come up short in a dashboard report if the attendee's contributions
were not recorded as notes, and some meeting data such as feedback ratings
by their very nature are subjective. It is recommended to use common sense
when reviewing and acting on dashboard reports.
![]() For many
reports, you can adjust the default weighting (relative importance) of
the parameters that contribute to the report, and you can adjust the default
company goals used in many report calculations. If one or more such adjustments
are necessary, you should carry them out before generating the report.
For more information on adjusting these default values, see "Managing dashboard settings".
For more information on company goals, see "Understanding
indexes, averages and goals" below.
For many
reports, you can adjust the default weighting (relative importance) of
the parameters that contribute to the report, and you can adjust the default
company goals used in many report calculations. If one or more such adjustments
are necessary, you should carry them out before generating the report.
For more information on adjusting these default values, see "Managing dashboard settings".
For more information on company goals, see "Understanding
indexes, averages and goals" below.
![]() Click
the Dashboards tab.
Click
the Dashboards tab.
![]() Click
the name of the report you would like to generate in the menu.
Click
the name of the report you would like to generate in the menu.
You can also click a report category in the main window to generate the first report in that category.
The report is displayed using default settings.
![]() (Optional)
Select the data that the report should be based on.
(Optional)
Select the data that the report should be based on.
The report is automatically updated as you select data. See "Selecting and filtering data for reports" below.
![]() (Optional)
Click Print
(Optional)
Click Print ![]() to save a PDF version of the finished report to your computer.
to save a PDF version of the finished report to your computer.
You cannot create PDF versions of opportunity reports, but you can email them directly to one or more recipients. For more information, see "Using opportunity reports".
All reports except opportunity reports contain a chart visualizing the report results. In addition, all reports contain a result table below the chart showing all data for the selected users or meetings.
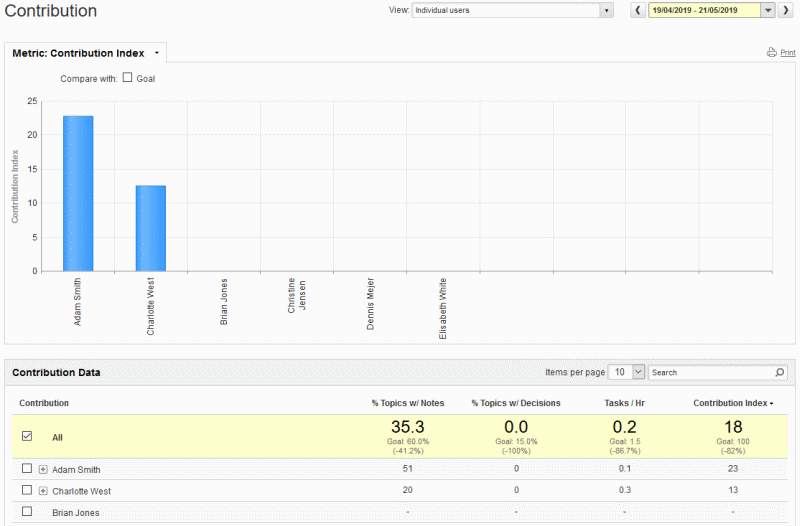
Each column of data in the result table shows a metric for the report. Metrics include simple data (for example, the number of meetings a user has participated in) and indexes calculated on the basis of data or other indexes.
The overall result for each metric is shown in the All row at the top of the result table; if relevant, the average or goal used when calculating the metric is shown underneath the overall result, along with any deviation from that average or goal.
Hover
the mouse pointer over each column heading to see a tooltip explaining
each metric.
If relevant, the tooltip explains how the metric is calculated. For more details on this, see "Metric calculations".

Indexes, averages and goals are explained in more detail under "Understanding indexes, averages and goals" below.
Filter items in the table using the Search field. You can also select
how many items should be displayed per page.
Click the arrows below the table to navigate
between pages of results (if applicable).

For most reports, you can select which metric should be displayed in the chart:
![]() Click Metric
at the top of the chart, and select which metric you want to see.
Click Metric
at the top of the chart, and select which metric you want to see.
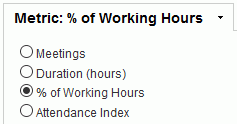
![]() Only the selected metric is displayed in
the chart, but all metrics are displayed in the result table.
Only the selected metric is displayed in
the chart, but all metrics are displayed in the result table.
You can select which users or meetings the report should be based on and indicate a date range for the report.
Once you have selected the data that the report should be based on, MeetingBooster remembers your selection until you log out of the system. This means that you can generate several different reports using the same set of data without having to specify the data every time you select a new report. For example, you could generate an Absence report, selecting which users and dates the report should cover, and then generate an Accountability report and a Blind Spots report for the same users and dates without having to select them again. The only two exceptions are the Meeting Performance and Meeting Series Performance reports where you select meetings or meeting series instead of users.
![]() Always make sure
that the report covers exactly the dates you require and that it is based
on the users or meetings you need. Even minor adjustments to the report
data can significantly change the report findings.
Always make sure
that the report covers exactly the dates you require and that it is based
on the users or meetings you need. Even minor adjustments to the report
data can significantly change the report findings.
You can specify which users in the organization should be included in the report. Only users that fulfil the criteria you set here are included.
![]() Click
the View drop-down.
Click
the View drop-down.
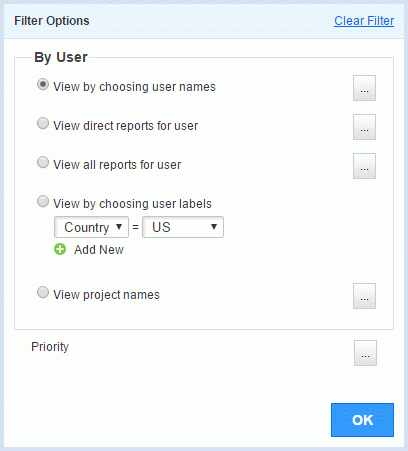
![]() In
the dialog that opens, do one of the following:
In
the dialog that opens, do one of the following:
Select View
by choosing user names, click the selection button ![]() and select the users wanted to generate a report based on specific users.
In the dialog that opens, you can specify the user name in the Add
User field. As soon as you start typing, user names that match
your search text are shown. You can also select a user from your most
used or recently used users.
and select the users wanted to generate a report based on specific users.
In the dialog that opens, you can specify the user name in the Add
User field. As soon as you start typing, user names that match
your search text are shown. You can also select a user from your most
used or recently used users.
Select
View direct reports for user,
click the selection button ![]() and select the
user wanted to generate a report based on that user's direct reports.
and select the
user wanted to generate a report based on that user's direct reports.
Select
View all reports for user, click
the selection button ![]() and select the user wanted to
generate a report based on that user's direct reports and all other users
below the selected user.
and select the user wanted to
generate a report based on that user's direct reports and all other users
below the selected user.
Select
View by choosing user labels to
filter users for the report by user labels, and select a user label and
a value to filter by. You can add more user labels for filtering by clicking
Add New ![]() .
.
![]() You can only select
user labels that have been enabled for filtering. For more information,
see "Working
with user labels".
You can only select
user labels that have been enabled for filtering. For more information,
see "Working
with user labels".
Select View
project names, click the
selection button ![]() and select the project(s) wanted to generate a report based on the members
of one or more specific projects.
and select the project(s) wanted to generate a report based on the members
of one or more specific projects.
(Task
reports only) Click the Priority
selection button ![]() to filter the tasks included in the report by task priority.
to filter the tasks included in the report by task priority.
![]() Click Clear Filter
to clear all filter criteria.
Click Clear Filter
to clear all filter criteria.
For the Meeting Performance and Meeting Series Performance reports, you select meetings or meeting series instead of users when you click View. For these two reports, the filter options dialog only contains one criterion, but otherwise the selection method is the same as described above. For more information on the Meeting Performance and Meeting Series Performance reports, see "Using performance reports".
You can specify a date range that the report should cover.
![]() Click
the date range drop-down list, and then do one of the following:
Click
the date range drop-down list, and then do one of the following:
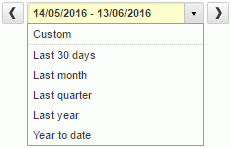
Select
Last 30 days, Last
Month, Last Quarter, Last Year or Year
to date to generate a report for that date range.
Select
Custom to open the date range
selector and enter a start date and end date manually.

Select custom start and end dates by doing one of the following:
Selecting the desired dates in the calendar
view to the left
Entering the desired dates in the date fields
to the right
![]() You can also
click the arrow buttons
You can also
click the arrow buttons ![]() next to
the date range selector to increase or decrease the date range selected
by one month.
next to
the date range selector to increase or decrease the date range selected
by one month.
The metrics include various types of index, for example an attendance index (in the Attendance report) and an absence index (in the Absence report). These indexes show the performance of the selected users or meetings compared to the company average or company goal.
The
company average for an index is
calculated automatically from MeetingBooster statistics for the entire
organization for a set period prior to the reporting date. For example,
if the organization has 50 users who spend a total of 200 hours of their
time in MeetingBooster meetings in the defined period, the company average
for meeting attendance is 4 hours for that period.
The company
goal for an index is defined manually. For example, you can define
that meetings in your organization must cover 3 agenda topics per hour,
or that discussions or decisions must be recorded for at least 50% of
all agenda topics or sub-topics during the meeting. These values become
company goals that all meetings in your organization are measured by in
the relevant dashboard reports.
No matter whether an index uses the company average or a company goal, that average or goal is defined as index 100. Values below 100 in a report therefore indicate that the user or meeting is below average, or does not meet the company goal, and values above 100 indicate that the user or meeting is above average, or exceeds the company goal. Example: If a user scores 67 on the Attendance Index in the Attendance report (which uses the company average for comparison), this means that the user has attended less meetings than the company average. For more details on index and other metric calculations, see "Metric calculations".
![]() You can set the period from which the
company average is calculated, and set all company goals, in the Admin
section. For more information, see "Managing
dashboard settings".
You can set the period from which the
company average is calculated, and set all company goals, in the Admin
section. For more information, see "Managing
dashboard settings".